Core Rules
What is Wargame Chess?
Wargame Chess is a turn and activation-based tabletop wargame that uses a chess set, but also incorporates other gaming devices like dice and cards. The core rules to the game are a simple framework to support a plethora of faction options. Understanding faction differences and interactions accounts for most of the game’s nuance.
Wargame Chess is not a variation of traditional chess - though it uses the same pieces and borrows some concepts from it, it is a wholly different game.
What do I need to play?
Two players will generally need the following items to play Wargame Chess:
- A chess set (a board and a full set of pieces).
- 2 or more small items that fit within a board square to represent Joker pieces.
- Deck of playing cards (henceforth referred to as the Minor Arcana deck).
- All 22 Major Arcana cards from a tarot deck.
- Various dice to be used between both players:
- Six or more 4-sided dice (d4's)
- Six or more 6-sided dice (d6's)
- Six or more 8-sided dice (d8's)
- Six or more 10-sided dice (d10's)
- Four or more 20-sided dice (d20's)
- 6 items to represent Trees on the board.
- Items to represent Blessing and Curse tokens.
- we recommend different coloured poker chips, as these sit under most chess pieces very well
- Two distinct types of small dice to represent Advantage and Disadvantage tokens, place these next to pieces to keep track of such token quantities.
- We recommend the dice used for Advantage tokens match the colour of your Blessing tokens, and the dice used for Disadvantage tokens match the colour of your Curse tokens.
Not necessary, but suggested:
- Themed pieces for your favourite faction
- If these are not chess pieces, make sure your opponent knows what they represent before your game starts!
- Notepad
- Use this to record information of a game which is not accommodated by the Activation Tracker.
To start a standard game
The next thing each player must do, after assembling the items mentioned on the previous page, is choose different factions. Each faction has different rules, strengths, handle certain situations better than others, or have tools at their disposal others wouldn't. You can find all factions here.
Most factions are not designed to pick up and play without pondering synergies and tactics. Your game will be far more enjoyable if you take the time to thoroughly read through your options and strategize.
Factions have varying degrees of rules and interactions you will need to be mindful of at key times. If you are unsure of how a rule is supposed to work, read through all the footnotes at the bottom of their page for clarification. If you are still left unsure as to how something functions, discuss and agree to a solution with your opponent.
To assess factions at a glance, they are assigned a star rating. Here is what they mean:
| Star Rating | Explanation |
|---|---|
| ★ | These factions are fairly straightforward. New players and seasoned players alike should be able to understand their nuances quickly. |
| ★★ | Two-star factions require a bit more effort to learn. New players may need a few games to get comfortable with them. Experienced players should be able to understand them within a game or two. |
| ★★★ | Three-star factions may be difficult to pilot for newer players. Experienced players may need to play a few games with them to find their groove. |
Building a team
Once both players have chosen a faction to play as, they will need to build a team list using options from that faction’s page. You can use the Activation Tracker or a notepad to organise your team, note rules that happen at certain times, and track other game information.
| A team consists of exactly 14 points worth of Pieces and Upgrades. |
|---|
Below we will explain how faction rules, piece choices, their quantities, and upgrades fit into your team list.
Faction Rules and Upgrades
Faction rules always apply their effects to that particular faction.
Upgrades are like Faction rules, except they have a point cost in parentheses after their name, and only apply their effects to that particular faction if you account for their cost in your team list. Be sure your opponent knows which Upgrades you have taken in a match.
Piece costs and quantities
The following point costs are the same across every faction in the game.
| Piece type | Point cost |
|---|---|
| Pawns | 1 |
| Kings, Bishops, Knights, Rooks, and Jokers | 2 |
| Queens | 3 |
Under their name, each piece will have a quantity allowance - listing how many of them you can have in a team. Here are a few examples of what you may see in faction entries and what they mean:
| Quantity limit example | Meaning |
|---|---|
| (0-2) | You may have 0, 1, or 2 of this piece in your team list. |
| (2-8) | You must take at least 2 of this piece, and may take no more than 8. |
| (1) | You must have exactly 1 of this piece in your list - no more, no less. |
| (0) | You cannot include this piece in your starting team list. However, some rules may add this piece to your team throughout the course of a game. |
Some rules may add pieces to your team throughout the game, and in some situations can cause you to have more than 14 points worth of pieces on the board! However, you can never have a piece added to the board if doing so would bring a piece type's total quantity beyond its listed quantity range maximum (eg. if your faction allows you to bring 0-2 Knights, your team could never have 3 or more), or the number of pieces that come with a standard chess set (eg. a standard set comes with 8 Pawn pieces, therefore your team can never have more than 8 Pawns).
Multiple options for one piece type
Some factions may list many options for a piece type (eg. They could have two different entries for a Rook). In such cases you may only run 1 of those options in your team list.
The exception to this are Joker options; as each Joker uses a unique model on the board, if a faction lists multiple Joker options, a player may include any/all of them in one list.
There are some situations where players using certain factions are allowed to Summon pieces to their team that may not have been in their starting list. These different options cannot be on the board simultaneously.
As an example, say a player was using "Knight option A" from their faction, and had the opportunity to Summon "Knight option B", they could not do so while option A is on the board. However, once all pieces of "Knight option A" are slain or removed from the board, and there is 1 Knight piece in the Summon zone, they could now Summon "Knight option B". Be sure to effectively communicate any changes during the game like this to your opponent. Going further with this example, if the player summoned "Knight option B" while the other Knight piece was removed from the board or slain, and a rule gave an opportunity for the piece to come back to the board, it cannot come back to the board:
- As "Knight option A"
- If "Knight option B" has a quantity restriction of (0-1) or (1)
Rank
Each piece on a faction’s roster is listed in ranking order - with the highest ranking piece at the top of the table, and the lowest ranking piece at the bottom. Almost every faction has a unique ranking hierarchy, and because of this no rule will ever compare rankings between different factions. Though some rules may compare ranking between pieces in the same faction.
Moves and Attacks
Move
When a piece Moves, it travels along a path as described in its entry (in the Piece types, dice, and common piece rules section below). During a Move, a piece cannot end up in a square occupied by other pieces. As well, a piece cannot end its Move in a square - or pass through squares - occupied by terrain features (like Trees) unless it has special rules that allow it to do so in some capacity.
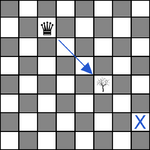
A piece must travel at least 1 square during a Move if possible. If a piece is not able to Move (either by a rule saying it cannot, or perhaps other pieces/terrain are blocking its possible paths of movement), then it is permitted to travel fewer than 1 square.
Attack
When a piece Attacks, it travels along the Attack path as described in its entry (see the Piece types, dice, and common piece rules section below).
A piece may only do its Attack if it would end up in a square occupied by an enemy piece (though some rules allow pieces to Attack non-enemy things, or even Attack allies). While a piece is Attacking another, both count as occupying that square and must complete this Attack sequence to resolve this.
When it does so, the owners of each piece have an opportunity to spend Advantage and Disadvantage tokens, apply modifiers, and/or resolve rule effects before dice are rolled.
Once those - if any - have been spent or applied, each player will roll the appropriate dice for those pieces simultaneously, sum the roll results, apply any other modifiers (a few rules in this game grant a bonus after a roll has been made), and compare the totals.
If the Attacking piece has a greater total, they have slain the Defending piece, and it is placed in the ‘slain’ zone on their player's Activation Tracker.
If the Defender has an equal or greater total, they do one of the following:
- Place the Attacker in an unoccupied adjacent square and give them a Disadvantage token, OR…
- They place themselves in an unoccupied adjacent square and gain an Advantage token.
Either of these options are what is referred to as Combat Movement.
"...cannot be slain..."
Occasionally, some pieces may have a rule in their entry stating (commonly under certain conditions) that they cannot be slain. Often it specifies what to do instead; in case it doesn’t, place that piece into an unoccupied adjacent square if possible. If that is somehow not possible, its owner redeploys it.
Piece types, dice, and common piece rules
Each piece type uses a specific type of dice for their rolls. The dice used for a type of piece are universal, and not different between factions. Likewise, the way each piece type Moves and Attacks are universal, and not different between factions.
There are a few special rules listed below in each piece type’s entry. Pieces of a particular type will have these rules by default and will not be listed in a faction’s entry. However, some factions may have their version of a piece not have one of these rules (eg. a handful of factions’ Pawns lose their Promotion rule) - it is assumed that all piece options of a particular type have the rules listed below unless a rule mentioned in their faction entry says otherwise.
Pawn
A Pawn may Move 1 square vertically or horizontally, and Attack 1 square diagonally.
Pawns use 2D4 for their dice and have the following common rules:
- En Passant:
- During its first Activation of the game, you may Move this Pawn twice.
- Promotion:
- At the start of this Pawn's Activation or Reactivation, if it is within your opponent's deployment zone, you may remove it from the board and place a slain, non-Legendary positional into the square that Pawn was just in. This positional counts as having Activated only if it Activated earlier this turn.
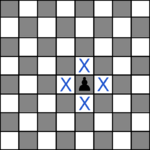 |
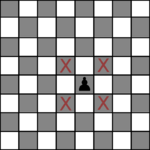 |
Rook
A Rook may Move 1 to 8 squares vertically or horizontally, and Attack 1 to 8 squares vertically or horizontally.
Rooks use 2D6 for their dice and have the following common rule:
- Castle
- When this Rook ends their Move adjacent to a non-Rook ally, they may swap places with them. If they do and that ally is lower in rank than this Rook, give that ally an Advantage token; if that ally is higher in rank than this Rook, instead remove a Disadvantage token from it (if it has any).
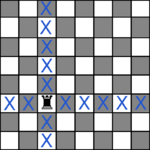 |
 |
Knight
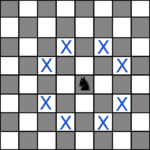
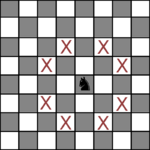
A Knight's Move places it into a square which is two squares vertically and one square horizontally from its current position, or two squares horizontally and one square vertically, jumping over other pieces or terrain; it Attacks this way as well.
Knights use 2D6 for their dice and have the following common rule:
- Mounted Advantage
- When Attacking a non-Knight enemy, if there are other enemies adjacent to the square that this Knight and its target are in (during an Attack resolution, both pieces temporarily share a square), roll this Knight’s dice at Advantage.
 |
 |
|---|
Bishop
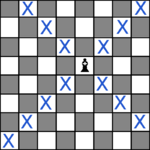
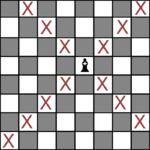
A Bishop may Move 1 to 8 squares diagonally, and Attack 1 to 8 squares diagonally.
Bishops use 2D6 for their dice, and have no common special rule.
 |
 |
|---|
Queen
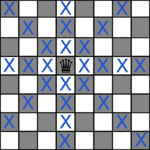
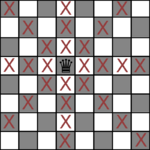
A Queen may Move 1 to 8 squares vertically, horizontally or diagonally, and Attack 1 to 8 squares vertically, horizontally, or diagonally.
Queens use 2D8 for their dice, and have no common special rule.
 |
 |
|---|
King
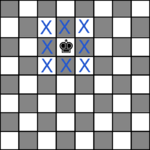
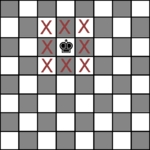
A King may Move 1 square vertically, horizontally or diagonally, and Attack 1 square vertically, horizontally, or diagonally.
Kings use 2D10 for their dice, and have the following common rule:
- Faction Leader
- When this piece is slain, their player loses the game immediately.
 |
 |
|---|
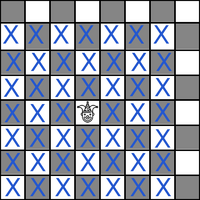
Joker
For a Joker’s Move, you place it into an unoccupied adjacent square, then you may do that up to two more times. In total, a Joker can traverse 1, 2, or 3 squares during its Move. Jokers cannot Attack. Jokers have the following common rule:
- Fool's Endeavour
- If all a player has left on the board are pieces with this rule, they lose the game immediately.
- At the end of the turn, remove any/all Dis/Advantage tokens from this piece.
Other common rules, rule tags, and shorthand terms
In the rules here, and in various faction rules, you may encounter the following terms.
| Term | Description |
|---|---|
| Re/Activation (term) | Used as a shorthand for "Activation or Reactivation". Though an Activation and Reactivation are functionally very similar, some rules specifically address one or the other. For rules referencing both, we often use this "Re/Activation" shorthand. |
| Dis/Advantage (term) | Used as a shorthand for "Advantage and Disadvantage". |
| Legendary (rule) | When a player is resolving their Pawn's Promote rule, they cannot choose a slain ally piece with this rule to replace that Pawn. |
| Summon (rule tag) | Some rules (of both faction rules and piece rules) can have the summon tag after their name, which means at some point when resolving that rule's effects you may be required to place a piece - which isn't a part of your starting team - onto the board. |
| Major arcana, minor arcana, and bone reading (rule tags) | Some rules (of both faction rules and piece rules) can have these tags after their name. Rules with these tags are considered 'faith mechanic' rules, and utilise or reference the major arcana deck, the minor arcana deck, and/or bone reading dice pool in some way. You can read about these in greater detail in the Faith Mechanics section further down this page. |
| Positional (term) | A positional is any piece that isn't a Pawn. Kings, Queens, Bishops, Knights, Rooks, and Jokers are all positionals. |
| Board half (term) | A player's board half comprises the four board ranks closest to them. Their opponent's board half comprises the four board ranks closest to their opponent. |
| Success / Failure (terms) | Some rules or effects mention a condition being a roll succeeding or failing, this is done to keep wording brief. A success of a roll would be if the action taking place for the piece rolling did end up happening, and a failure would be the opposite. |
Setup
Each player chooses opposing board halves. Determine who will be setting up Trees on their half of the board first. You may do this by verbal agreement, or by random means - such as flipping a coin.
Tree Setup
The player who is setting up Trees first rolls a D4 and a D8. The D4 result determines what rank (in the board half closest to them) it will be in, and the D8 will determine the file. Place a Tree on that square. Do this again 2 more times. If a Tree would end up on a square with a Tree already on it, reroll the D4 and D8.
Then the other player chooses one of the following for the Tree setup in their half:
- They may mirror the Tree setup in the other half of the board.
- They may mirror and horizontally flip the Tree setup.
- They may randomly generate a Tree setup (as described above).
Piece Setup
Regardless of their choice, the player who generates Tree setup second will be the first to deploy their pieces. Unless stated otherwise in a faction’s special rules, pieces are set up in a player’s deployment zone - which are the two ranks on the board closest to the player. Whenever a rule mentions redeploying a piece, you set it up anywhere within your deployment zone. When prompted to redeploy, pieces that are already in your deployment zone may be kept where they are, and they will count as having been redeployed.
Card and Dice Setup
The following things to set up are dependent on team composition and have detailed explanations later on:
- If any players’ pieces use the Minor Arcana mechanic, shuffle that deck and set it aside face down.
- If no Joker pieces are present in either team, the Joker cards are left in the Minor Arcana deck.
- If the number of Joker pieces being used by players is 1 or 2, remove 1 Joker card from the deck and set it aside face up before the game starts.
- If the number of Joker pieces being used are 3 or greater, remove both Joker cards from the deck and set them aside face up before the game starts.
- If any players’ pieces use the Major Arcana mechanic, shuffle that deck and set it aside face down.
- If a player's pieces use the Bone Reading mechanic, they assemble these dice pools and keep them aside.
- Each bone pool will only be used by its player.
- If a player's team has any Pawns, add a D4 to this collection. If it has any Knights, Rooks, and/or Bishops, add a D6. If it has a Queen, add a D8. If it has a King, add a D10. If it has any Jokers, add a D20.
- Do not use these dice for any rolling beyond those required by bone reading effects. Some bone reading rules require the rolled results to be preserved until some later point.
- Lastly, make sure you have enough other dice to be used for each of your types of pieces you are taking on your team.
Setup order chart
| Player 1 | Player 2 |
| 1. Sets up their Trees. | |
| 2. Sets of their Trees. | |
| 3. Deploys their pieces. | |
| 4. Deploys their pieces. | |
| 5. Both players take turns showing each other what pieces are on their team list, and answering any questions their opponent has about it. | |
| 6. Set up cards and dice. | |
| 7. Resolve any pregame effects (rule effects that happen before the first Activation). | |
| 8. The game begins with Turn 1. | |
| 9. Activates a piece first during the turn. | |
Setting pieces up randomly
This is a rare situation, but when a rule calls for pieces to be set up randomly, placed randomly, deployed randomly, or redeployed randomly on the board do the following:
- Roll two D8, one after the other. The first determines which rank of the board that piece will be set up in, and the second will determine the file.
- If the square at that coordinate is unoccupied, place that piece in that square. If the square is occupied and it cannot co-occupy that square with whatever is occupying it, you may re-roll one or both dice, or scatter the piece from that square (more on this below).
- Some pieces have rules which allow them to co-occupy a square with other things (such as specific terrain types).
Scattering
When a player is prompted to ‘Scatter’ a piece, token, or other on-board item, assign each square adjacent to them a value from 1-8 (it doesn’t matter the order you number them, just be consistent). Once you’ve done that, roll a D8, and move that item into the unoccupied square matching the result. If the item cannot be placed into that square (it is occupied and/or they cannot co-occupy the square with whatever is in it) re-roll the D8.
Pieces off the board
There are a few situations where pieces may not be on the board. The most common of which is when a piece has been slain. Less common situations involve rules that may cause a piece to be deployed or set up on the board at a later time, or rules that temporarily remove pieces from the board. As well, pieces that could be summoned by a faction’s rules are kept off the board.
We advise players to use the provided Activation Tracker sheet provided to organise their pieces which aren’t on the board.
In some situations, pieces that have been removed from the board may return to it by some means. In all cases like this, those pieces returned to the board do not count as having Activated unless they did so earlier in the turn, or the rule bringing them back says otherwise.
- Eg. A Knight Activates in turn 3, is slain, then is returned to the board later in turn 3; it still counts as having Activated.
Turn structure
The following is a technical breakdown of the game’s turn structure, and while this first section is functionally comprehensive, the following section shows a simplified breakdown of a turn.
Comprehensive turn breakdown
- Beginning of turn effects
- A) All effects that happen at the start of the turn resolve in the following order. For each of these steps, players will go back and forth resolving relevant and applicable rules, one at a time, starting with the player who will be Activating pieces first this turn.
- Faction rules
- Faction upgrades
- Piece rules
- A) All effects that happen at the start of the turn resolve in the following order. For each of these steps, players will go back and forth resolving relevant and applicable rules, one at a time, starting with the player who will be Activating pieces first this turn.
- Activations
- A) Determine who is Activating first this turn.
- This is generally the player who did not Re/Activate a piece last in the previous turn - some rules may alter this.
- B) That player Activates a piece that hasn’t Activated yet this turn (read above section: Activations)
- If a player has Activated all their pieces when they are passed opportunity to Activate, they Reactivate a piece.
- C) Any “between Activations” effect triggered in the previous Re/Activation resolves now.
- If a player has multiple effects to resolve here, they choose the order in which they resolve.
- If both players have effects to resolve here, the player who just Re/Activated a piece resolves their effects first.
- D) Does one team have no pieces on the board? If so, the player with pieces on the board wins immediately. If not, proceed.
- E) Are there still pieces on the board that haven't been Activated? If yes, the other player goes back to step 2B; if not, both players go to step 3.
- A) Determine who is Activating first this turn.
- End of turn effects
- A) All “at end of turn” effects resolve in this order; players go back and forth like at the start of the turn, but starting with the player who did not have the last piece Re/Activation.
- Faction rules
- Faction upgrades
- A) All “at end of turn” effects resolve in this order; players go back and forth like at the start of the turn, but starting with the player who did not have the last piece Re/Activation.
General turn breakdown
- "Beginning of Turn" effects.
- One player Activates a piece of theirs that hasn’t Activated yet this turn. If all their pieces have Activated, they instead choose one of their pieces and Reactivate it.
- Any "between Activations" effects resolve now.
- If there are still pieces left to Activate on the board, repeat steps 2 and 3 for the other player.
- "End of Turn" effects.
Objective
A normal game of chess ends in a checkmate, but in this game not every team will have a King piece to make things so decisive.
The goal of this game is to eliminate all of your opponent’s pieces. If at any point a player has no more pieces left on the board, their opponent wins the game.
Some pieces or factions may have other ways of attaining victory (such as alternate victory conditions). If a game reaches the end of Turn 10 and no player has achieved victory by some means, both players add up the number of points worth of pieces they each have on the board, add to that the number of points in upgrades they each took, and compare totals - the player with the greater total wins. If both point totals are the same, the game is a draw.
Inconclusive games
If you are unable to resolve a game for whatever reason, the player with a greater points worth of pieces on the board, plus points worth of upgrades, wins. If both point totals are the same, the game is a draw.
Advantage and Disadvantage
Advantage and Disadvantage
When a piece is rolling their dice at Advantage, instead of summing the results of the rolled dice, they double the result of the higher one. Inversely, when a piece is rolling at Disadvantage, they double the result of the lower die instead.
If a piece would be granted Advantage on a roll it has Disadvantage on - or vice versa - they cancel each other out. If there are multiple instances of Advantage and Disadvantage applying to the same roll, each instance of one cancels out an instance of the other.
If a piece would be granted Advantage on a roll and a rule is preventing them from rolling at Advantage, that roll does not happen at Advantage. The same applies for Disadvantage and the preventing of such.
Advantage and Disadvantage Tokens
Pieces with Advantage tokens may spend 1 before they roll both their dice to give themselves Advantage on that roll.
If a piece has any Disadvantage tokens and they are prompted to roll their dice, they must spend 1 such token before rolling them - doing so gives Disadvantage on that roll.
If a piece with an Advantage token would receive a Disadvantage token - or vice versa - they cancel each other out. This applies also when managing larger quantities of these tokens (eg. If a piece has 4 Disadvantage tokens and they are given 3 Advantage tokens, they will be left with 1 Disadvantage token).
If a piece would spend an Advantage token to roll its dice at Advantage but some effect is preventing its rolls from being at Advantage, the token is still spent and they cannot roll their dice at Advantage. The same is true if a piece must spend a Disadvantage token, but some effect is preventing it from rolling its dice at Disadvantage - the token is spent, but it still cannot roll its dice at Disadvantage.
Dis/Advantage and Jokers
As Jokers only roll one die, they cannot roll it at Advantage or Disadvantage. If a Joker receives any Dis/Advantage tokens, they cannot spend them to gain Dis/Advantage. At the end of the turn, remove any/all Dis/Advantage tokens on all Jokers. A player cannot voluntarily give their own Joker either type of token unless it is the only legal target for one. A player may give an opponent’s Joker either type of token even if there are other valid targets.
Example interaction
A Knight with an Advantage token will Attack an enemy who is adjacent to another enemy, but…
- …there is an effect preventing the Knight from Attacking at Advantage.
- The Advantage granted to the Knight from its rule Mounted Advantage is inhibited. And though it will have an opportunity to spend a token, the Advantage token will have no effect.
- …there is an effect making the Knight Attack at Disadvantage.
- The Advantage granted to the Knight from its rule Mounted Advantage is cancelled out by the Disadvantage affecting it, making its roll normal. It still gets an opportunity to spend the Advantage token it has; if it does spend it, its dice go from being rolled normally to being rolled at Advantage.
Blessings and Curses
Blessed
If an effect would cause a piece on your team to receive one or more Advantage tokens, other ally pieces which have a Blessing token also receive one. This cannot trigger before the first Activation of the game. If a piece with a Blessing token would receive a Curse token, they cancel each other out and both are removed from the piece. A piece that is Blessed cannot have another Blessing token placed on it, nor be a target for a Blessing token.
Blessed pieces cannot gain Advantage tokens as a consequence of another Blessed piece gaining an Advantage token from an initial trigger (i.e. there is no infinite feedback loop of receiving those tokens).
Cursed
If an effect would cause a piece on your team to receive one or more Disadvantage tokens, other ally pieces which have a Curse token also receive one. This cannot trigger before the first Activation of the game. If a piece with a Cursed token would receive a Blessed token, they cancel each other out and both are removed from the piece. A piece that is Cursed cannot have another Cursed token placed on it, nor be a target for a Curse token.
Cursed pieces cannot gain Disadvantage tokens as a consequence of another Cursed piece gaining a Disadvantage token from an initial trigger (i.e. there is no infinite feedback loop of receiving those tokens).
Example interaction
The following pieces are on the same team:
- Piece A
- Piece B (Blessed)
- Piece C (Blessed)
Situation 1:
- Piece A gains 3 Advantage tokens from a rule’s effect. As Pieces B and C are Blessed, they see that their ally gained some number of Advantage tokens, so they each gain 1 Advantage token. No other Advantage tokens will be gained.
Situation 2:
- Piece A has a rule that gives it an Advantage token when it successfully Attacks, and Piece B has a rule that gives allies an Advantage token when they successfully Attack. Piece A successfully Attacks. Piece A’s rule gives it an Advantage token, so Pieces B and C each gain 1, as they are each Blessed. Piece B’s rule gives Piece A an Advantage token, thus Pieces B and C each gain 1 more from their Blessings.
Targets and Roll Success/Failure
Choosing valid targets
If you would go to resolve an effect that requires a target (often a piece), you must select a valid target (e.g. if you would go to Curse a piece that cannot be Cursed, you must instead select a piece that can be). If there is no valid target, the parts of the effect that require a target cannot resolve. Should an effect have multiple steps to its resolution, but only some parts requiring a target cannot resolve, the other parts that don’t require a target may still resolve - given that they are not contingent on the other target-requiring part to resolve.
Succeeding or Failing a roll
Some rules or effects mention a condition being a roll succeeding or failing, this is done to keep wording brief. A success of a roll would be if the action taking place for the piece rolling did end up happening, and a failure would be the opposite.
As an example, a Knight is Attacking an enemy Rook. If the Knight’s Attack roll was higher than the Rook’s Defence roll, then the Knight’s Attack roll would be considered a success and the Rook’s Defence roll would be considered a failure.
Even in cases where a commonly bad outcome (eg. a player's piece fails a Defence roll) could be seen as advantageous for a player's strategy, that outcome is still considered a failure. Success or failure is based on the intent of the roll's function, and not on the overall strategic goal.